I am presenting a number of costume events next year including “Enter the World of Jane Austen – Regency Costume Talk with Display”– A very interesting, lively, humorous and informative lecture about the design and construction of gowns I have created inspired by the Regency period. Beautifully costumed dummies will accompany the talk. Included is a white cotton afternoon dress for Jane Austen worn with a pink wool spencer and stovepipe bonnet.

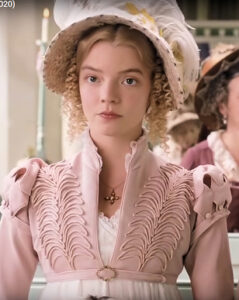
As a number of my customers have seen the new film ‘Emma’ released in 2020 and commented upon the beautiful costumes I decided to re-create an outfit inspired by a costume worn by Anya Taylor-Joy in the title role as Emma. She wears it at the wedding of her governess who becomes Mrs Weston.
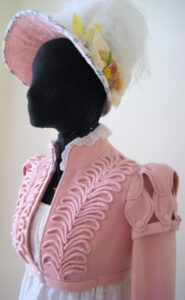
This exquisite pink fine wool Spencer jacket is worn over a high waisted white cotton dress with Regency bonnet. This jacket is one of the more complicated nevertheless extremely attractive garments worn in the film. I decided to reproduce so I could include it in my Regency Costume display – I have also designed a ‘Stovepipe’ bonnet inspired by the one worn by Emma in the same scene.

As a pattern is not available for this jacket I adapted a pattern I have already used to make a regency Spencer in red velvet. My Rocking Horse Farm Jacket pattern has quite a few differences however it was an great pattern to use as a base.
 The Spencer worn by Anya Taylor-Joy in the film looks a fairly similar shape however the neckline and front are open on the pink spencer. Plus the sleeves are also very different and it has a lot of trimming including complex cording and buttons which decorate the front and back. It looks like a it has been designed in fine pink wool (it is always difficult to tell if you have not seen the garment in reality) and fully lined.

A Regency Spencer was usually made in woolen or silk cloth. I used 3 yards of 60 inch fabric for the jacket and 2 yards for the silk lining. The fabric used in the film looked like a very fine cashmere/wool, I used something similar albeit a bit heavier in weight . Pink wool coating fabric from www.minerva.com however I am sure you’ll agree it still makes beautiful decoration on my version of the jacket.
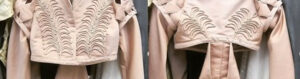
I have also included a screenshot of the back of the jacket for you to view.
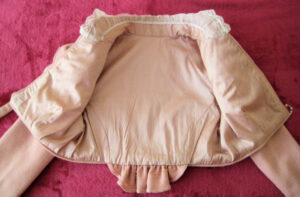
I cut out the body of the jacket – two fronts and a back – sewed the darts in the front – then stitched the side back seams and the shoulder seams. This was repeated for the lining. The two collar sections were sewn together and basted to the neck edge. The lining was sewn into jacket right sides together up fronts and across neck edge leaving bottom edge open. I sewed the jacket and lining right sides together along front edge and neck edge and turned the jacket was turned the right way out and pressed it.
I matched the bottom edge of the jacket and lining and armholes and sleeves and basted them together – the body is then treated as one piece.

For the full length sleeves I used my long sleeve pattern from my Regency Gown Sense and Sensibility pattern as it was exactly the shape I wanted. Next step was to sew the elbow darts in the long sleeves and sew the sleeve seams together- this is then repeated for the lining.

With right sides together I pinned the lining to the lower sleeve at bottom matching seams and then stitched them together. The sleeve was turned wrong side out – the lining was brought up over the sleeve then basted to lining. Sleeves are now treated as one piece.

I adapted the Rocking Horse Farm upper sleeve pattern to draft the short curvy shaped upper sleeve. The sleeve was lined and the edged was piped. Four diamonds of fabric with piped edges are attached together by buttons to the upper sleeve and an armband to create the elaborate over sleeves. The upper sleeve and long sleeve were then basted together at the top. Two rows of stitches were run along upper edge of sleeve and the sleeves were gathered to fit and sewn into the armhole.
The sleeves had a straight cuff however Emma had an over long flared cuff with a small band and button to hide the seam so I added this detail to my jacket.

A piece of fabric 3 1/4 inch wide by the measurement under bust plus 5 inches for the front tab was folded in half lengthwise right sides together to create the waistband. I stitched across the ends and the corners were trimmed and it was turned the right way out and pressed.

The waistband is sewn to the bottom edge of the jacket. The loose end of the band sewn together for 5 inches together at the end to create the front fastening tab. A pretty buckle was then sewn onto the end of the waistband.

This elaborate jacket has cording created from tubes of fabric decorating the front and back. It needed a lot of cording so a lot of fabric! If you would like to know my easy method for making the cording please message me and I would be happy to help. 
The spencer worn in the film has a long piece of fabric attached at centre back which looks to me like a gentleman’s tie – I was not so keen on it so changed it to a pretty ruffle and also added self-covered buttons to the back and sleeves of the jacket.
 I finally hand stitched a collar of pretty lace inside the neckline of the jacket to complete the effect.

I have designed a hat inspired by the one worn by Anna Taylor Joy worn by Emma – it is a “stovepipe” Regency bonnet so called because of its high crown.

The hat worn by Emma was quite high however I preferred a slightly lower crown so I used ‘Ophelia’ a pattern with instructions to create a regency/federal era poke bonnet from 1810 – 1820. I bought it from Jane Austen.co.uk and would definitely recommend it if you fancy making it yourself.
 My hat has been made from three pieces of buckram – a brim, a crown and a circular tip. The bottom edge of the brim and also the circle tip are sewn round the edge with millinery wire – I used metal ferrules (they can be purchased quite cheaply online) to join the wire securely. The edges of the center back of the buckram brim and the edges of the buckram crown are then sewn together. The brim, crown and top are then covered separately with domette. Domette is a fabric like winceyette which pads out the base, so the hat is more cushioned and comfortable.
 I used white cotton with a square pattern to cover my bonnet. I bought the cotton from “Spoonflower Fabrics” which is an online fabric company with extensive choices of fabric for a very reasonable price. You can choose the pattern and then decide the type of fabric you will like to have it printed upon. I neatly covered the brim, top and crown in the cotton. I also embellished the inside of the brim with exquisite pink lace and then carefully sewed the three pieces together. I finally lined the crown of the bonnet in pink silk fabric.

I decorated the hat with yellow wired fabric leaves, three narrow cream organza ribbons sewn together to create wide ribbon bows. I also used green silk leaves and natural chrysanthemum dried sunflowers. To add the finishing touch I added some beautiful white nodding feathers.

I am sure you will agree this is a very pretty outfit and quite similar to the costume worn by Anya Taylor-Joy in the film. I am looking forward to presenting my Regency Talk and including this new stunning Regency outfit!
